FFmpeg算是音视频学习中不可能不接触的一个航空母舰,这系列文章算是翻译的一系列的文章An ffmpeg and SDL Tutorial or How to Write a Video Player in Less Than 1000 Lines,只是他使用的api较老,我的教程基于最新的FFmpeg4.0版本,开发环境时clion,默认使用cmake构建工具.
下载地址:http://ffmpeg.org/download.html
概述
视频文件有几个基本组件。 首先,文件本身称为容器,容器的类型决定了文件中信息的位置。 比如AVI和Quicktime。 是一系列的streams, 通常有一个音频流和一个视频流。流中的数据元素称为帧。 每个流由不同种类的编解码器编码。 编解码器定义了数据是如何编码和解码的 - 因此称为CODEC。比如DivX和MP3. 数据包是可以包含数据的数据片段,这些数据可以被解码为原始帧,每个数据包包含完整的帧,在音频流下可能包含多个帧。
处理音视频数据不比较简单,主要分为以下几个步骤:
1 | 10 打开视频文件,获取streams |
使用FFmpeg处理视频非常简单,本文介绍如何将一个视频文件的帧数据保存为一张ppm格式图片(ppm是一种非常简单的原始RGB数据文件,它包含一个非常简单的头信息,其余的数据全部是RGB数据).
打开文件
首先我们要将用到的库引入进来,编写一个错误输出函数:
1 |
|
该函数将FFmpeg内部的错误代码转换为了字符串,提高可读性.下面编写主函数,要求传入至少一个参数,并将该参数作为文件路径来打开.
1 | fileName = argv[1]; |
在4版本中av_aregister_all()函数已经被废弃,不需要再编写任何信息.
int avformat_open_input(AVFormatContext **ps, const char *url, AVInputFormat *fmt, AVDictionary **options)函数的作用是打开url指向的文件.
AVFormatContext是FFmepg非常重要的一个结构体,相当于安卓中的contex,它为FFmpeg的avformat提供了一个上下文,让,开发者可以非常简单的获取这些信息.但是要注意这里传如的是AVFormatContext的指针的指针,所以我们的pFromatCtx是一个指针,而传入参数时需要传入该指针的指针.
fmt是该文件的格式,这里传入NULL后FFmpeg会自动判断文件的编码格式.
然后读取头信息,将信息显示出来:
1 | if (avformat_find_stream_info(pFormatCtx, NULL) < 0) { |
avformat_find_stream_info该函数将文件的streams的信息读入pFormatCtx->streams,然后通过av_dump_format函数打印出这些详细信息.
测试文件输出的详细信息如下:
1 | Input #0, matroska,webm, from '../in.mkv': |
在视频文件中包含许多的流,比如视频流,音频流,而音频流可能又包含多种音频,比如上边的输出信息中,视频流时stream0,音频流包含两个,分别是stream1日语和stream2国语.该篇文章的目的是将视频流分解为帧,保存前50帧信息,那么需要找出对应的视频流,代码如下:
1 | for (i = 0; i < pFormatCtx->nb_streams; i++) { |
pFormatCtx的streams中保存了所有的流信息,AVCodecParameters,这个结构体中保存了AVMediaType,这个枚举类就是流的类型:
1 | AVMEDIA_TYPE_UNKNOWN = -1, ///< Usually treated as AVMEDIA_TYPE_DATA |
我们只需要遍历找出视频流即可,并保存AVCodecParameters和索引,AVCodecParameters除了有AVMediaType外,还有一个AVCodecID,这个枚举类保存了该视频文件的编码方法,我们需要根据这个ID来寻找对应的解码器:
1 | pCodec = avcodec_find_decoder(codecPar->codec_id); |
寻找解码器后旧需要来初始化解码器的相关内容了,这个主要是liaavcodec库完成,同样它需要一个上下文环境:
1 | pCodecCtx = avcodec_alloc_context3(pCodec); |
上面的代码中首先为pCodecCtx分配了一块区域,然后将我们之前的codecPar参数传给它,使pCodecCtx设置为相对应的参数.然后avcodec_open2初始化pCodecCtx,这样打开解码器的工作旧完成了.
数据处理
做了一个最简单的分析图: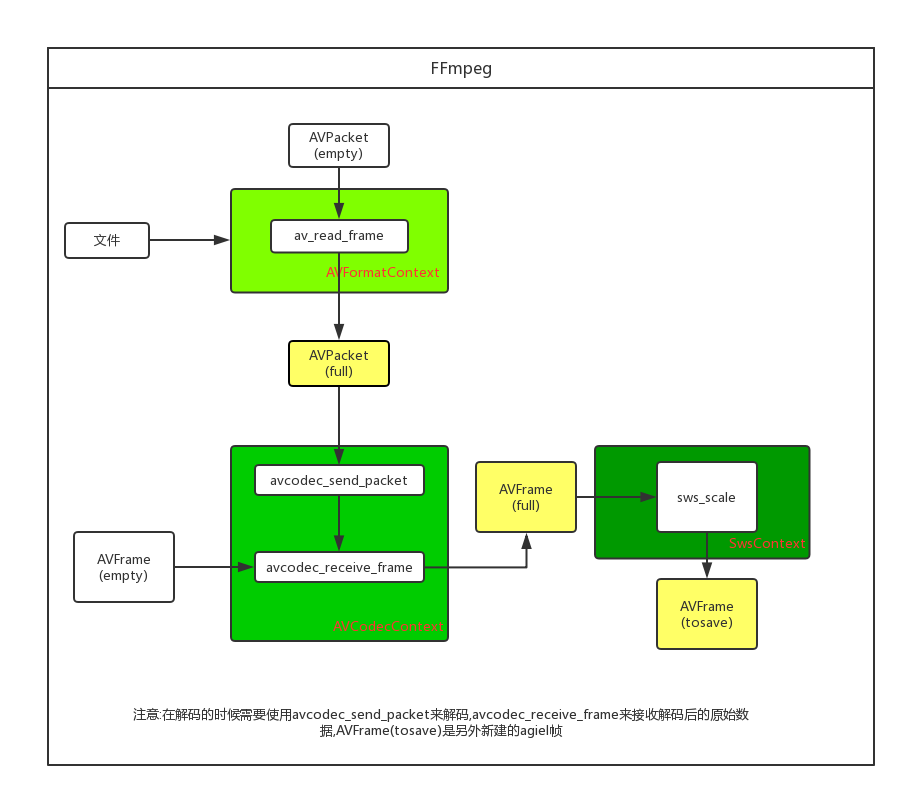
首先需要初始化一些数据结构体
1 | pFrame = av_frame_alloc(); |
pFrame是用来存储解码后原始数据的一个结构体,对应于途图中的pFrame(empty)和pFrame(full),pFrameRGB是经过SwsContext变换后的数据,对应于图中的pFrame(tosave),我们可以直接存储pFrameRGB为图片.buffer是指向数组的一个指针,它是用来提供给pFrameRGB的一块数据区域.SwsContex是libswscale的上下文环境,用来简单的缩放图片.
下面我们需要来处理数据了:
1 | while (av_read_frame(pFormatCtx, &packet) >= 0) { |
首先是通过av_read_frame来将video_stream中的数据读入packet,然后将这个packet通过avcodec_send_packet发送给AVCodecContext,AVCodecContext将这些数据解码为原始图像数据帧,我们可以通过avcodec_receive_frame来获取解码后的帧,然后经过SWScaleContext来将图像数据格式化为rgb格式,最后我们需要不断的释放packet.这里注意一点,avcodec_send_packet和avcodec_receive_frame并不是一一对应的关系,也就是输入数据后并不一定都必须要输出数据,这是因为AVCodecContext可能会缓存几帧数据.
保存数据
保存数据较简单,直接看代码:
1 | void SavaFrame(AVFrame *pFrame, int width, int height, int frame) { |
释放资源
FFMpeg中的大部分分配资源都提供了一个简单的释放方法,我们逐个调用即可:
1 | av_free(buffer); |
运行项目
首先配置以下cmake文件:
1 | cmake_minimum_required(VERSION 3.10) |
假如没有安装pthread,首先要装好pthread,要不然程序不能运行,还要注意库的链接顺序.
下面是pthread的安装代码:
1 | sudo apt-get install glibc-doc |
可以直接使用clion的运行功能来运行程序,但是首先要添加视频文件路径作为参数.我们也可以在命令行直接生成文件文件运行
1 | mkdir build;cd build/ \\执行外部构建 |
执行完成后我们即可看到生成的ppm文件,再clion直接打开即可.